Juniper EX4300 pam files corrupt

Amnesiac (ttyu0)
login: root
rts_filter_prep_fields error getting rt_flags in rtentry_t
Amnesiac (ttyu0)
login: root
Amnesiac (ttyu0)
login:
Amnesiac (ttyu0)
login: root
Amnesiac (ttyu0)

Huh no prompt for a password there just login: over and over.
Boot into single user mode.

FreeBSD/PowerPC U-Boot bootstrap loader, Revision 2.4
(dc-builder@svl-cdbu-pool007.juniper.net, Wed Jun 19 20:28:02 PDT 2013)
Memory: 2048MB
bootsequencing is enabled
bootsuccess is set
new boot device = disk0
Loading /boot/defaults/loader.conf
/kernel data=0xb5cbe6+0xd582a syms=[0x4+0x9d690+0x4+0xe62e2]

Hit [Enter] to boot immediately, or space bar for command prompt.

Type ‘?’ for a list of commands, ‘help’ for more detailed help.
loader> boot -s

Trying to mount root from ufs:/dev/da0s1a
Attaching /packages/junos via /dev/mdctl…
Mounted junos-ex package on /dev/md0…
System watchdog timer disabled
Enter full pathname of shell or ‘recovery’ for root password recovery or RETURN for /bin/sh:

Just hit enter and don’t go into recovery. Prompt changes to #.

NOTE: to go to multi-user operation, exit the single-user shell (with ^D)
# mount -a
WARNING: /config was not properly dismounted
WARNING: /var was not properly dismounted
/var: mount pending error: blocks 4 files 1

# chflags 0 /var/etc/pam.conf
# exit

chflags 0 /var/etc/pam.conf and exit to reboot. This fixed the problem where I just kept seeing login: over and over with no password prompt.

Amnesiac (ttyu0)

login: root
— JUNOS 14.1X53-D12.9 built 2015-06-25 03:06:46 UTC
rts_filter_prep_fields error getting rt_flags in rtentry_t
root@:RE:0% al daemons:set cores for group access
root@:RE:0%

Logs in correctly now and I ran the JunOS upgrade from here and got everything stable again.

Annoying messages.
Auto Image Upgrade: To stop, on CLI apply
“delete chassis auto-image-upgrade” and commit

Auto Image Upgrade: No DHCP Client in bound state, reset all DHCP clients
Auto Upgrade: DHCP Client State Reset: irb.0 vme.0
configure
Entering configuration mode

{master:0}[edit]
root# delete chassis auto-image-upgrade

{master:0}[edit]
root#
set system root-authentication plain-text-password
New password:
Retype new password:

{master:0}[edit]
root# commit
configuration check succeeds
commit complete

{master:0}[edit]
root> request system software add /var/tmp/jinstall-ex-4300-17.3R3.10-signed.tgz reboot
NOTICE: Validating configuration against jinstall-ex-4300-17.3R3.10-signed.tgz.
NOTICE: Use the ‘no-validate’ option to skip this if desired.
Verify the signature of the new package
Verified jinstall-ex-4300-17.3R3.10.tgz signed by PackageProductionRSA_2018
WARNING: A reboot is required to install the software
WARNING: Use the ‘request system reboot’ command immediately
Rebooting …
shutdown: [pid 2254]
Shutdown NOW!

Boots up in the new OS
root@:RE:0%
root@:RE:0% cli
{master:0}
root>
{master:0}
root> show version
fpc0:
————————————————————————–
Model: ex4300-48p
Junos: 17.3R3.10
JUNOS EX Software Suite [17.3R3.10]
JUNOS FIPS mode utilities [17.3R3.10]
JUNOS Crypto Software Suite [17.3R3.10]
JUNOS Online Documentation [17.3R3.10]
JUNOS jsd [powerpc-17.3R3.10-jet-1]
JUNOS SDN Software Suite [17.3R3.10]
JUNOS EX 4300 Software Suite [17.3R3.10]
JUNOS Web Management Platform Package [17.3R3.10]
JUNOS py-base-powerpc [17.3R3.10]
JUNOS py-extensions-powerpc [17.3R3.10]

Get rid of some errors related to snapshots being different.
root> request system snapshot media internal slice alternate all-members
fpc0:
————————————————————————–
Formatting alternate root (/dev/da0s1a)…

Copying ‘/dev/da0s2a’ to ‘/dev/da0s1a’ .. (this may take a few minutes)
The following filesystems were archived: /

{master:0}
root>
root> show system alarms
4 alarms currently active
Alarm time Class Description
2019-02-15 12:20:53 UTC Major FPC 0 PSU 1 Output Failure
2019-02-15 12:20:48 UTC Major FPC 0 PSU 1 Not OK
2019-02-15 12:20:38 UTC Major Management Ethernet Link Down
2019-02-15 12:20:01 UTC Minor Rescue configuration is not set

{master:0}
root> show chassis alarms
3 alarms currently active
Alarm time Class Description
2019-02-15 12:20:53 UTC Major FPC 0 PSU 1 Output Failure
2019-02-15 12:20:48 UTC Major FPC 0 PSU 1 Not OK
2019-02-15 12:20:38 UTC Major Management Ethernet Link Down

Clean up some more alarms.
root> request system configuration rescue save

Power it down and wait till I need this as it is now the spare.

Tasmota Martin Jerry Smart Switch

smart switch
smart switch installation
INSTALLATION REQUIREMENT
It fits the standard mult-gang outlet plate, and outlet box. Just replace your non-smart switch with this smart one in 10 mins.

Neutral wire is required
One-way switch (NOT 3-way)
2.4G Home WiFi network (NOT 5G)
iOS or Android phone
Basic electrical wiring experience
Basic installation tools (screwdriver, wire strippers, voltage checker)
I used these settings that I found and can’t find again from the Internet. With generic it gives me three switch options in the local page but I’m only using one here.

I also have some Martin Jerry smart plugs that I loaded Tasmota on. One problem with these is they display as OFF in the Tasmota software when they are on. I removed entries from GPI04 and GPI05 to get rid of two extra buttons that were displayed in the GUI. The button on the side of the plug works but doesn’t light up right now.

For the plugs that I had, the relay needed to be changed otherwise off was on and on was off. So D6 change 29 to 21 and it works as expected.

I’ve got a generic Tuya Smart outdoor plug that I flashed with Tasmota. It has two outlets on it so the settings are below.

I named the outlets one and two and loaded them into Hubitat with the Sonoff-Tasmota driver as two separate virtual devices as switch number 1 and switch number 2. This plug is branded Amzdest with two outlets.

I tried another outdoor plug that I have this one is three outlets and labeled as Tonbux. I couldn’t get the third outlet working but found a link with a number of similar devices and used the setup from there.

Three outlet outdoor plug
{“NAME”:”Outdoor3Outlet”,”GPIO”:[0,0,0,23,56,0,0,0,21,17,22,0,0],”FLAG”:0,”BASE”:18}

Italian Bread Recipe

3 cups flour
2 tsp. sugar
½ tsp. salt
1 pkg. (2¼ tsp.) dry yeast
1 cup warm water
2 Tbsp. olive oil
1 egg white, beaten

In large bowl, mix flour, sugar, salt, and dry yeast. Add warm water and oil. Mix well. Turn dough out onto lightly-floured surface. Knead dough 10 minutes. Place dough in lightly-greased bowl, turning once to grease top. Cover with a warm, moist kitchen towel and let sit in warm place for about 40 minutes. Sprinkle ungreased cookie sheet with cornmeal. Punch dough down and cover. Let rest 15 minutes. Shape dough into long loaf, about 12 inches long, and place on cookie sheet. Cover and let rise in warm place for about 35 minutes, or until doubled. With a sharp knife, make a deep lengthwise cut in the top of the loaf. Brush the loaf with egg white and bake at 375° F for 30 minutes or until it sounds hollow when tapped and is a golden brown. Cool on wire rack.

Hubitat

I decided to move my smart home devices to Hubitat from SmartThings. The hub is small about two by two inches and half an inch thick. It uses an external Z-wave/Zigbee stick. About Half the size of my SmartThings hub. I have used the SmartThings hub since December 2016.

hubitat

Yes that USB adapter sticks out the side of the hub, making it look like an afterthought. Setup was smooth and their interface works well. I think it works better than using the interface for SmartThings however there is no app that can be used to easily control devices when I’m not home. They do allow some web links back to the hub but these seem to work intermittently so far, mostly due to my connection not being stable on my phone. The idea is to automate things as much as possible and keep traffic local so its a trade off. I didn’t have to much trouble with the SmartThings hub, but I don’t see the need to have everything out in the cloud when most of this gets managed locally and has no need to leave the house.

Devices I have moved over so far include.

  • Yale YRL220 lever locks. Removing from SmartThings was a little troublesome but they paired right up with Hubitat and Hubitat was able to read the existing codes from the locks as well as add and delete new codes. I think the removing was just an issue with how I did the removal. I should have read the instructions before starting. October 2017
  • Sengled E11-G13W Smart LED Soft White (Element Classic) Bulb Zigbee. Removed from SmartThings and paired up with Hubitat no problems. October 2018
  • Tuya Smart devices. These devices use the Tuya Smart app and I”m still working on getting that setup in the house. It requires an external node.js server running on my Raspberry Pi. I haven’t set all of this up yet.
    • Wireless Garage Door Opener Remote WiFi Switch Universal Controlled by Smartphone. I can control up to three devices with this and it uses a proximity sensor to indicate if a door is open or closed. 2018
    • Martin Jerry mini Smart Plug 2017
  • Everspring ST812 Z-Wave Wireless Flood Detector Haven’t moved this one yet. 2018
  • Wemo Switches work over WiFi, no problems connecting them but some issues with getting them to work remotely consistently. These were my introduction to IoT devices and I have them placed where I can’t easily get to light switches. They have been very reliable with my first one installed for about three years now. December 2015
  • Samsung SmartThings Water Leak Sensor Zigbee. Battery lasts about a year and works well for leaks. I would not place it where it can be submerged. Moved over from SmartThings to Hubitat with no problems. September 2016
  • Samsung SmartThings GP-U999SJVLCAA Smart Water Leak Sensor, Zigbee. Paired up no problems and reads temperature fine. September 2018
  • Samsung SmartThings GP-U999SJVLAAA Door and Window Multipurpose Sensor, Zigbee. This has a tilt sensor in it and so far Hubitat is not reading that correctly. I want to use the tilt sensor on the garage door to let me know if the door is open or closed. September 2018
  • Sonoff Basic using Tasmota firmware no luck with these so far. These are using WiFi. 2018
  • Kankun Smart Switches WiFi, from a variety of manufacturers. These all run OpenWRT and are controlled with some json code in SmartThings. No luck with getting the groovy code from SmartThings to Hubitat yet, but I haven’t spent much time with this so far. I get an error on line 127 right now that I need to dig into. With some help from the Hubitat forums, I changed physicalgraph with hubitat in the code on line 127 and it works now. These are all the same device sold by different companies.
    • Amcrest 2015
    • JTD 2016
    • QISC  2017
  • Sensi UP500W Thermostat on WiFi. I haven’t done anything on this yet it didn’t work under SmartThings and I don’t know if I’ll even try to move this onto Hubitat. December 2016
  • Ring Doorbell Pro and Spotlight Camera Plugin. I haven’t tried anything with this yet. I am using IFTTT with the Wemo app to turn on lights when I arrive home and this works well, but it is outside of Hubitat. 2017
  • Zooz Z-Wave Plus Smart Plug ZEN06 VER. 2.0 with 2 USB Charging Ports, White. This is on order from Amazon and I’ll use it in the garage as a repeater for the Z-Wave network. Setup was easy with Hubitat, no problems. The size of this plug is a bit on the large side, but it is designed to only cover one outlet in a duplex. December 2018
  • Leviton Z-Wave VRPD3-1LW Vizia RF + Series 300 Watt Plug-In Lamp Dimming Module for CFL and LED. Worked no problems bringing it from SmartThings to Hubitat. January 2017
  • Leviton DZPA1-2BW Decora Smart Plug-in Outlet Z-Wave Plus. Worked no problems bringing it from SmartThings to Hubitat. December 2017
  • Aeotec Range Extender 6, Z-Wave Plus repeater, Aeotec Range Extender 6, Z-Wave Plus repeater It was tough to get this to link up the first time with Hubitat but it did eventually connect and is working well now. I could have just as easily used a plug with Z-Wave Plus and gotten the functionality of the of the plug for about the same price. December 2018
  • Aeon Labs Aeotec Z-Wave Gen5 Multi-Sensor (Z-Wave Plus) I had given up on this with SmartThings mostly because of battery life being useless. With Hubitat and four fresh AAA batteries it seems to be working well so far. December 2016
  • Aeotec TriSensor, Z-Wave Plus S2 Motion, Temperature, Light Sensor, 3-in 1 Paired up quickly and working well for about a week or two now. November 2018
  • Z-Wave Plus Gold Plated Reliability Garage Door Tilt Sensor, White (TILT-ZWAVE2.5-ECO). Connected up with a couple of tries removing and putting the battery back in. Contact sensor works with the gerneric z-wave contact sensor driver from Hubitat. December 2018

Garage Door Opener with WiFi

20180811_214138I bought this switch from Amazon its listed as the wireless garage door opener remote WiFi switch universal. I connected terminals L and N to 110 volt AC power I connected this to twelve volts DC on the red and black wires and the black and green wire to a door magnetic contact sensor for an indicator to let me know if the door is open or closed. The light in the bottom center is the indicator for open or closed door. Light on door is open and off is closed.

20180811_215539
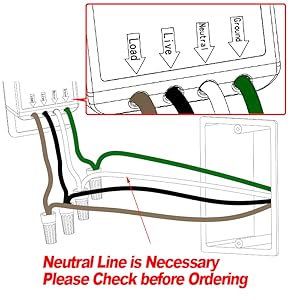
The instructions are a bit weak so I’m unsure what that red wire is for, I’m just going to cap it off for now. Even the instructions on the back of the device seem a bit unclear. The paper that came inside the box had the usual small print that required a magnifying glass and just wasn’t clear. It turns out using the red and black wire connected to a 9-30V DC power supply this can be run without the AC connection I tested with.

20180811_210041
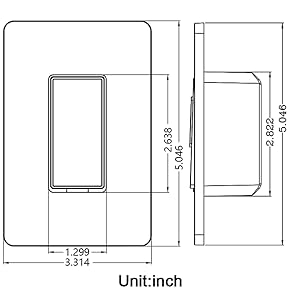
A will be for the positive to the garage door opener and Com to the negative. You can use B and Com for a second door and C and Com for a third door or gate. However you only get one open and close indicator for all three. I’m going to use this to replace the wall switch for the garage door and give me the option to use WiFi to open and close the door as well as monitor the status of the door. I also ordered a type 86 wall junction box to put this in and mount it to the wall.

I used the Tuya Smart phone app for control and integrated this with my Home Assistant setup running on a Raspberry Pi. I chose Tuya Smart because I already have this setup for several other devices.

screenshot_20180811-224539_tuyasmart

screenshot_signal_strength

The device has lost the WiFi signal several times. I exchanged a couple of emails with the seller HeJue and that has proved pretty useless so far as the emails just seem to generate a couple of canned replies.

“Hi Jonathan Smith, Sorry for the inconvenience. First of all, we need to confirm a question with you, have you connected all the wires correctly? Can you control the opener by touch our switch button? If yes, it means that the wiring are correct. Then comes to check the WIFI. Pls kindly make sure that your WIFI router is 2.4G, attached is the FAQ list for your reference, pls kindly check it to make sure your WIFI meed the demands. Waiting for your reply. Regards, Hejue”

Since it does work but is dropping the WiFi connection randomly, I’ll guess the wiring is correct. I ended up setting up a cronjob with two pings every five minutes and this has kept the device online for about forty eight hours now. Rock solid for over a week now.

It looks like these are just a NodeMCU with momentary relays and the power supply built in. Below is what it looks like in Home Assistant. For some reason Home Assistant doesn’t see my renaming of Button A to Garage Door. With a restart of Home Assistant it eventually picked up on the renames.

Screenshot 2018-08-11 at 10.52.04 PM

Cable Modem Woes

I’ve since returned this modem and have basic modem with one ethernet port and phone jacks. I was using an Arris cable modem which is proving to be garbage.

System: ARRIS DOCSIS 3.0 / PacketCable 2.0 Touchstone Telephony Gateway
HW_REV: 5
VENDOR: Arris Interactive, L.L.C.
BOOTR: 1.2.1.61
SW_REV: 7.5.63C.SIP.PC20.TW
MODEL: TG862G
Battery Charger FW Rev: 02.10
 Firmware Build and Revisions
Firmware Name: TS070563C_032913_MODEL_862_GW_TW_SIP_PC20
Firmware Build Time: Fri Mar 29 11:42:55 EDT 2013
eSAFE 0 FW Revision: 2.0.40_0920E

I tried to do DHCP reservations and it seems these just fail with no error displayed.  I wanted to change the subnet it uses and that isn’t allowed either. Wireless seems to lock up randomly and requires a reboot. I have multiple AP’s and funnel DHCP back to the Arris so usually I just end up on an AP that is farther away that what is ideal for my setup.

I built a DHCP server on my Raspberry Pi as a work around to not being able to reserve an IP and have that working smoothly for a couple of days now. I’m considering getting a different modem with out wireless or the phone ports ( I don’t use the phone ports) and then maybe a Ubiquiti Networks UniFi AP Enterprise WiFi System UAP-3 and using that so all of my APs would be from one manufacturer and work together better. Currently I’m using a mish mash between the cable modem and other old AP’s that people have discarded. I just don’t want to spend the $180 or so that it costs to get this equipment and use Ubiquiti’s proprietary POE.

Raspberry Pi email IP at boot

I found a bunch of what seem complicated answers for how to do this. I made my own eventually just using bash and adding it to /etc/rc.local, turns out I didn’t need to have it in rc.local either, if I put it in /etc/network/if-up/ and made it executable.

#!/bin/bash
#Send an email with the local IP
#sleep added to give me a wait to the process during boot and before remove to give the #script some time to run. These may not be needed. Adjust as needed.
sleep 5
#grep -v added to trim out some extra info from the file
#date added so it would append a time stamp to file
ifconfig | grep inet | grep -v inet6 | grep -v 127.0.0.1 >> file.tmp | date >> file.tmp
#-s after mail gives me a subject line
echo “$(cat file.tmp)” | mail -s IPaddress <email@domain.com>
sleep 5
rm file.tmp

I added this line to /etc/rc.local, but I was getting two copies of the email on boot up. So I deleted it.

/etc/network/if-up.d/mailip-1

If I wanted my external IP I could add a line like below. Maybe put a line in cron to run the script every so often and get this info at times other than when I boot the Pi or when renewing the IP.

dig +short myip.opendns.com @resolver1.opendns.com >> file.tmp

To get dig I had to add apt-get install dnsutils.

Raspberry Pi Term Server

So I got this idea online to make my own terminal server with a Raspberry Pi and ser2net.

20180301_151019

Hardware needed.

  • UGREEN USB to Serial RS232 Cable Adapter 4 Ports DB9 Converter 9-Pin Male to Male with Hexnuts
  • Raspberry Pi

Software installed.

  • Raspbian Stretch Lite I’m running this on Buster now
  • Ser2net
  • UFW
  • Screen

I think a Pi Zero could also do the job and save a few dollars. So far it remembers the port numbers on reboot and my config is good but I’m working on getting the logging to work the way I want it.

Install ser2net running Raspbian Stretch:

apt-get install ser2net  Then edit /etc/ser2net.conf with your USB to information that I got from running “dmesg | grep tty”.

[ 4.518967] usb 1-1.5.1: pl2303 converter now attached to ttyUSB0
[ 4.523283] usb 1-1.5.2: pl2303 converter now attached to ttyUSB1
[ 4.535015] usb 1-1.5.3: pl2303 converter now attached to ttyUSB2
[ 4.539260] usb 1-1.5.4: pl2303 converter now attached to ttyUSB3

And my ser2net.conf looks like this.

2000:telnet:600:/dev/ttyUSB0:9600 8DATABITS NONE 1STOPBIT banner
2001:telnet:600:/dev/ttyUSB1:9600 8DATABITS NONE 1STOPBIT banner
2002:telnet:600:/dev/ttyUSB2:9600 8DATABITS NONE 1STOPBIT banner
2003:telnet:600:/dev/ttyUSB3:9600 8DATABITS NONE 1STOPBIT banner

<TCP port>:<state>:<timeout>:<device>:<options>

apt-get install ufw

sudo ufw default deny

sudo ufw allow ssh

sudo ufw enable

sudo ufw status numbered

Installed screen:

sudo apt-get install screen

screen -S term <to open a screen with the name term>

jon@raspberrypi:~ $

screen commands

screen –ls to list

screen –r to reconnect

screen –r <session number> if more than one session open

ctrl +a followed by d to leave a screen open and disconnect

ctrl+d to disconnect and close the screen

jon@raspberrypi:~ $ screen -ls

There are screens on:

        906.pts-0.raspberrypi   (26/01/21 20:35:30)     (Detached)

        873.pts-0.raspberrypi   (26/01/21 20:33:10)     (Detached)

2 Sockets in /run/screen/S-jon.

jon@raspberrypi:~ $

To use the terminal server I ssh in and then run screen and open a terminal in there. The advantage to that is I can leave the terminal running during an upgrade and go get some milk and cookies.

telnet 127.0.0.1 2001

Escape character is ctrl ] and then q at the prompt to get out.

telnet> q

Connection closed.

Upgrade Kankun Smart Plug

To preserve some changes and files I added. Add their path to sysupgrade.conf, in my case this is /www/ and /www/cgi-bin/.

# cat /etc/sysupgrade.conf

## This file contains files and directories that should
## be preserved during an upgrade.

# /etc/example.conf
# /etc/openvpn/
/www/
/www/cgi-bin/
root@cat:/rom/www/luci-static#


Download the upgrade to /tmp/

wget -O /tmp/openwrt-15.05.1-ar71xx-generic-tl-wr703n-v1-squashfs-sysupgrade.bin http://downloads.openwrt.org/chaos_calmer/15.05.1/ar71xx/generic/openwrt-15.05.1-ar71xx-generic-tl-wr703n-v1-squashfs-sysupgrade.bin

Run the upgrade and set back and wait. One site I found on the web said they had problems with wireless being disabled after running sysupgrade -c on one of three attempts. If that happens it means I’ll be opening the case and soldering pins to the headers to get wireless enabled again.

sysupgrade -c /tmp/openwrt-15.05.1-ar71xx-generic-tl-wr703n-v1-squashfs-sysupgrade.bin

BusyBox v1.23.2 (2016-01-02 18:01:44 CET) built-in shell (ash)

W I R E L E S S F R E E D O M
—————————————————–
CHAOS CALMER (15.05.1, r48532)
—————————————————–
* 1 1/2 oz Gin Shake with a glassful
* 1/4 oz Triple Sec of broken ice and pour
* 3/4 oz Lime Juice unstrained into a goblet.
* 1 1/2 oz Orange Juice
* 1 tsp. Grenadine Syrup
—————————————————–

root@cat:~#

Seems like it worked, the plug is sitting there with a blue light like it is still upgrading.

root@cat:~# cat /etc/openwrt_release
DISTRIB_ID=’OpenWrt’
DISTRIB_RELEASE=’15.05.1′
DISTRIB_REVISION=’r48532′
DISTRIB_CODENAME=’chaos_calmer’
DISTRIB_TARGET=’ar71xx/generic’
DISTRIB_DESCRIPTION=’OpenWrt Chaos Calmer 15.05.1′
DISTRIB_TAINTS=”
root@cat:~# cat /etc/openwrt_version
15.05.1
root@cat:~#

After the install finished I was good and logged back in using the password that I had set for root. The relay didn’t work to turn the switch on and off  but adding two lines to rc.local corrected this problem.

echo 26 > /sys/class/gpio/export
echo out > /sys/class/gpio/gpio26/direction

After doing that and testing with a couple of reboots I can run the commands below to turn the outlet on and off from the CLI or go to the web page that I build and do the same there. Just the line with the word echo in them.

#ON:
#echo 1 > /sys/devices/virtual/gpio/gpio26/value
#OFF:
#echo 0 > /sys/devices/virtual/gpio/gpio26/value

Space is at a premium on this device after the upgrade.

root@corner:~# df -h
Filesystem Size Used Available Use% Mounted on
rootfs 1.0M 256.0K 768.0K 25% /
/dev/root 2.0M 2.0M 0 100% /rom
tmpfs 14.2M 68.0K 14.1M 0% /tmp
/dev/mtdblock3 1.0M 256.0K 768.0K 25% /overlay
overlayfs:/overlay 1.0M 256.0K 768.0K 25% /
tmpfs 512.0K 0 512.0K 0% /dev
root@corner:~# exit
root@cat:/~# df -h
Filesystem Size Used Available Use% Mounted on
rootfs 512.0K 396.0K 116.0K 77% /
/dev/root 2.3M 2.3M 0 100% /rom
tmpfs 14.0M 64.0K 13.9M 0% /tmp
/dev/mtdblock3 512.0K 396.0K 116.0K 77% /overlay
overlayfs:/overlay 512.0K 396.0K 116.0K 77% /
tmpfs 512.0K 0 512.0K 0% /dev
root@cat:~#

Smartthings is broken now and I can’t use voice commands on Alexa for this plug either until I sort that out.


Wages

I was filling the Heep up with gas today at the local Cumberland Farms and noticed a help wanted sign “Starting pay $13 an hour”.
This made me think of Al Vermalia he was an old codger I worked with years ago. He used to tell me how easy I had it since when he started out at seventeen cents an hour back in the day.
When I started minimum wage was $2.65 and I got a raise a few weeks later when the state minimum went up. I’m starting to understand why that seemed so huge to Al and I think I might be the old codger now.

When I hit seventy how much will that dollar be worth then?