Bluetooth Serial Adapter

I found this on Amazon. DSD TECH SH-B23A Bluetooth 2.0 to RS232 Serial Adapter with DB9 Converter. The pictures in the Amazon listing didn’t show jumpers. Some sites say you need to hold the switch while powering up others just change the jumpers ahead of time. I think it depends on what hardware DSDTECH actually ships you.

Software to set the baud rate can be downloaded from DSDTech-Global

Manual for the device.

Set the baud rate. For me I connected a serial adapter to the serial port on SH-B23A and set BAUD to 9600 and com port to 7 and selected the tab for HC-05 in the software. Set the jumpers to PC and powered up the SH-B23A then pushed the micro-button and the DSDTECH tool software would get an ok when I sent an AT command. There is going to be some trial and error here. When done move the jumpers back to Device for connection to a switch or whatever you are using. I have two of these and just set one at 115200 and the other is left at 9600 as those are the most common settings for me. Default connection in the software is 9600 mine below is set to 115200. The DSDTech website says to use HC06, mine worked with HC05 and failed with HC06.


Button if needed

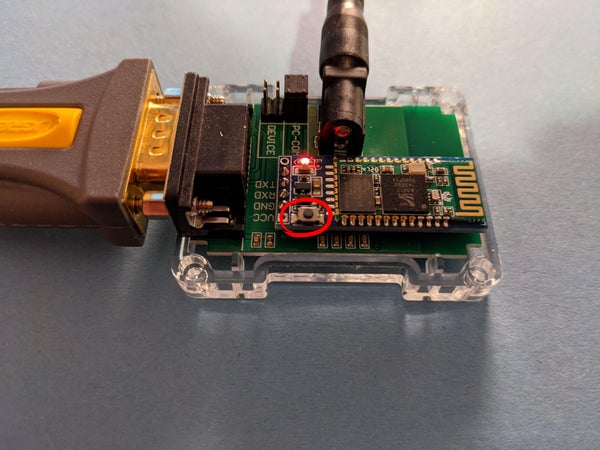
Remember to switch the jumpers from “PC” back to “device” after changing baud rate.

jumpers


If you don’t get an “OK” after pressing “test”, you’re not connected to your computer. And even though it looks like you are changing the device parameters in the software, you are not. Worse, You will still be able to “connect” or “pair” via blue tooth with another device, but the baud rate likely won’t be correct (because you never actually changed it) and it will be connected via blue-tooth, but it won’t work (ie will not transmit data).

I used Windows 10 for my setup, may not matter.

Connected to the USB port on the front of a Cisco 3850 works well for power.

I am going to cut some holes in the case so I can press the micro button and move the jumpers without taking out the screws. Just need to use tweezers and something like a paper clip to push that button. I ended up not using the top half of the case.

I missed on the first attempt and had to drill a second hole.

Instructable with setup information. Another version with slightly different setup steps.

DSD TECH SH-B23A Bluetooth 2.0 to RS232 Serial Adapter with DB9 Converter

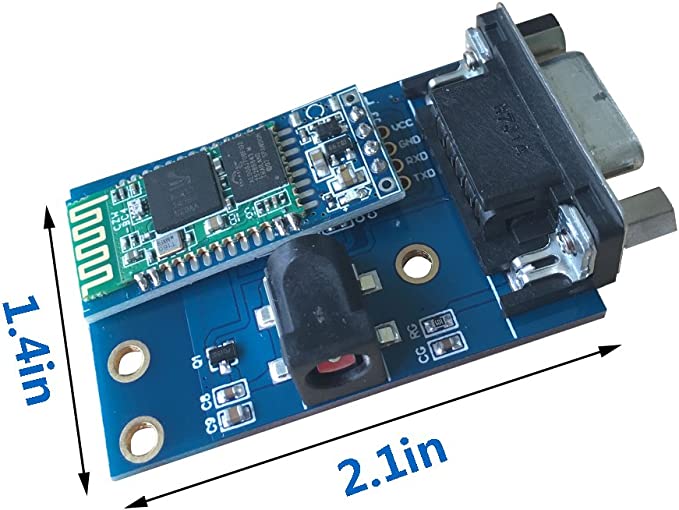
Amazon picture is different than what I get when I order, but what I have works fine.

The excitement never ends

The kitchen has been remodeled and one of the reasons the kitchen needed to be remodeled was a water leak, causing a soft spot in the floor. Because of this leak and since I am a bit of a geek on home automation, I have set up systems to monitor for any new leaks.

The heart of the system is my Hubitat Elevation hub and multiple sensors located around things that can leak. Since I have been using this for a couple years I have an older hub, I think they are on version C7 now mine is a C5 I believe.

Hubitat HubZL-LD-100_rope

I have one leak sensor on the sink, one on the dishwasher, and a third on the washing machine just off the kitchen. Another set of sensors in the crawl space by the water pump and the water heater. The plan is to add a switch to shut off the main water line and another for shutting off the water pump.Zlink

Two sensors hanging under the kitchen sink, one goes over to the dishwasher and the other monitors the drain.

The hub and the sensors are in now I need to look at the valve. I am thinking the Leak Gopher may be the way to go. So once a sensor triggers Hubitat can send a message to the valve and shut off the water line.

The last piece is a shutoff for the well pump. Aeon Labs makes an Aeotec heavy duty smart switch that can handle 40 amps or I could use a contactor and a ZWave+ plug to turn it on and off.

I am using a rather expensive Red Coral Technology box using a contactor with a WeMo switch for WiFi control to manage the hot water heater. This is about twice the cost of others that are on the market now and doesn’t seem to be available any longer. It has worked flawlessly for over two years and hasn’t caused me any problems. I think it saved the cost of purchase in about ten months. I think I picked that one because it was rated for 50 amps at 240 volts, where the Aeotec is only 40 amps. I have thought about changing out the WeMo switch with a ZWave+ switch just to standardize things a bit more, but the default setup here has worked very well.

Red Coral

18650 Rechargeable Batteries

I have several of the 18650 Ultrafire batteries in different sizes from 2500 mAH to 4000 mAH. I left a couple of them sitting unused for six months and when I came back they had discharged completely and would not take a charge.

20171115_150252.jpg

I found on Google that I could direct connect power from a USB port and get these to charge up enough that my regular charger was able to bring one set back to a usable level of charge.

The second set wouldn’t charge in anything I had so I ordered a new charger from Amazon in the hopes that it would be able to revive this pair of batteries. Lucky for me it did and they now test out over 3.7 volts with a multi meter.

20171115_151156.jpg

These were the 4000 mAH Ultrafire battery and they seem to be working fine now. the second pair are 3000 mAH and they just didn’t want to charge in either of the two chargers that I have. The new charger doesn’t seem to have this problem and so far the batteries have not even heated up while on this charger.

Intelligent Charger, SEWE LCD Display Universal Smart Charger for Rechargeable Batteries Li-ion batteries 18650 18490 18350 17670 17500 16340(RCR123) 14500, Ni-MH/Ni-Cd A AA AAA Batteries

20171115_150252.jpg

20171115_150243.jpg

Italian Bread

The finished product.

2 cups lukewarm water (~100°F)
1 package active dry yeast ((2.25 teaspoons))
5 cups flour
2 tablespoon light brown sugar
2 tablespoons olive oil
2½ teaspoons salt

FOR THE TOPPING (OPTIONAL)
1 egg white (lightly beaten)
2 tablespoons sesame seeds

DIRECTIONS:
Stir the yeast into ½ cup of the warm water. Let proof as you measure out the dry ingredients. I didn’t bother with proofing the yeast as the King Arthur site says you don’t need that.

Combine 5 cups flour, sugar and salt in the bowl of an electric mixer. Add the yeast mixture, remaining water, and olive oil. Using a dough hook attachment, mix on the lowest speed of electric mixer until a dough starts to form, adding more flour as needed, up to an additional ¾ cup.
Knead on low speed for 7 minutes. Transfer dough to a lightly floured surface and knead by hand for 1 to 2 minutes, or until a smooth, firm, elastic dough is formed.

Transfer the dough to a lightly oiled bowl and spray the dough with a thin coating of cooking spray. Wrap the bowl with plastic wrap and set aside to proof in a warm, draft-free place for 1½ hours or until doubled in size.

Remove the plastic wrap, punch down and flatten the rounded dough with the heel of your hand. Roll the dough up tightly, sealing the seam well after each roll. The dough should be elongated and oval-shaped, with tapered and rounded (not pointed) ends.

Place a baking stone on the center oven rack and preheat the oven to 425°F. Place a metal baking pan on the lowest rack.

Place the dough on an inverted baking sheet. Allow the dough to proof, loosely covered with a floured dish towel, for 30 minutes, or until doubled in size.

If using the topping, brush the dough with the egg white and sprinkle the sesame seeds over the top. Using a razor blade or sharp knife, slash the dough lengthwise about 1/4-inch deep, keeping the blade at a 45-degree angle.

Just prior to placing the bread in the oven, pour 1 cup of water into the metal pan you placed on the bottom rack of the oven. Then, transfer the loaf from the peel to the stone in the oven.

Bake the dough until golden brown and a hollow thud is heard when tapping the bottom of the bread (it should register at least 195 degrees F on an instant-read thermometer), about 30 to 40 minutes. Allow the bread to cool before slicing.

Picture Frame from a TV and RaspberryPi

Hardware used

Raspberry PI 3B+ you could also use a Pi Zero W, I already had the PI

Sceptre E205W-1600 2020 20″ 75Hz 

VideoSecu LCD LED Monitor TV Wall Mount

Short HDMI cable

Software used

Raspbian

Eye of Gnome

SFTP to map a drive to my Chromebook so I can just take new photos and drag them over into the folder.

SWISH installed on a windows PC or SFTP NET Drive so you can use SFTP like a mounted drive and and not install anything else on the Pi. Not something I needed but its here in case I change my mind or someone else wants an idea.

Installed raspbian.

Pricing out a twenty inch digital picture frame on Amazon they were in the $200 to $300 range. I put this together for under $125. It also lets me use wireless to move pictures into or out of the slideshow.

Change Eye of Gnome to set the time delay for the slideshow. Added eog-plugins to be able to randomize the slideshow.

gsettings set org.gnome.eog.fullscreen seconds N <N= number of seconds between slides>

sudo apt-get install eog-plugins

Edited crontab -e to start and stop the slideshow on a schedule. vcgencmd is used to start and stop output on the HDMI port starting at 8 AM and stopping at 9 PM. I Used Crontab Guru online tool to help set the times. The vgencmd commands are to turn the display off at 9 PM and turn it back on at 8 AM, then at 8:01 start the slideshow.

0 8 * * * vcgencmd display_power 1 <Turns the screen back on at 8AM>
1 8 * * * /home/pi/scripts/display.sh
0 21 * * * vcgencmd display_power 0 <blanks the screen at 9PM>

Wrote a couple scripts to start the slideshow. Make the scripts executable “chmod 755 <script.sh>” and put all the scripts in a folder named scripts.

display.sh
DISPLAY=:0.0 /home/pi/scripts/runslideshow.sh

runslideshow.sh
eog –slide-show /media/Slides/

Used screen to run testing of the scripts.

screen -ls to list screens

screen -r <screen number> to reattach to a screen

The screensaver would kick on after a while and the temperature would go to 84.9’C or higher sometimes. So I disabled the screensaver completely in the GUI. the problem seems to have gone away with that change.

Things to do.

Make a wooden frame for the TV so it looks like a picture frame?

Clean up the power cables

The handicap van and blue lines on the pavement

Recent events have brought to light the decline of civilized society and entitlement of the entitled people. I speak of those parking in handicap spots without a permit and those parking along side a handicap van that is in a marked spot with the parking space next to it marked in blue paint to ensure there is room to load and unload the van occupants.

handicap parking

Usually those lines n the pavement are painted blue and accompanied by signs on posts to make clear for the more dense. You could contact the local police however by the time they arrive the offender will usually be long gone and it will have further inconvenienced the people trying to use these spots by having them wait around for longer periods of time then what would happen if they just left a note on the offending vehicle and left.

chair

For these special people that insist on parking in these spots remedies have been suggested such as leaving a note, placing a sticker on the vehicle or just shooting the vehicle with a paint ball gun.

handicap

Maybe that sticker is to much, also keying the offenders car or shooting with a paintball gun have been determined to be to much as well. This is something that has irritated me for years as my father had one bad leg that limited his mobility. Its possible this made me more aware of the situation and the problems it can cause.

I prefer the turtle coloring page but you can’t always have one available when you need it.

turtles rule

English muffin bread

3 cups flour
1 cup warm water
2 eggs
1 packet dry yeast
salt to taste
Corn meal to coat the bread pan with
Mix one cup flour and dry ingredients.
Add eggs and water
Mix three minutes
Mix in the rest of the flour slowly until a nice ball forms
From into a loaf and set in the greased and corn meal coated bread pan.
Let sit one hour in a warm place or until it rises to the top of the pan.
Heat the oven to four hundred degrees
Bake for about twenty minutes and cover to keep the top from browning to much.
Bake another ten minutes or until it sounds hollow.
Remove from the pan and let it cool

bread
English Muffin Bread

Campfire Cobbler

INGREDIENTS

6 peaches, chopped

2 c. raspberries

1 c. blueberries

1 c. chopped strawberries

1/4 c. plus 2 tbsp. sugar, divided

2 tbsp. cornstarch

2 tsp. ground cinnamon

pinch of kosher salt

2 1/3 c. Bisquick Mix

1/2 c. milk 

DIRECTIONS

  1. In a bowl, combine fruit, 1/4 cup sugar, cornstarch, cinnamon, and salt. Mix well.
  2. In a bowl, combine Bisquick and milk. Mix, until completely combined.
  3. Butter a large cast-iron skillet. Add fruit mixture and top with Bisquick topping. Sprinkle with remaining 2 tablespoons sugar.
  4. Cover with foil and cook over a campfire until biscuits are no longer doughy and fruit is warm and bubbly, 50 minutes.
  5. Let cool 20 minutes, then serve.

Juniper EX4300 pam files corrupt

Amnesiac (ttyu0)
login: root
rts_filter_prep_fields error getting rt_flags in rtentry_t
Amnesiac (ttyu0)
login: root
Amnesiac (ttyu0)
login:
Amnesiac (ttyu0)
login: root
Amnesiac (ttyu0)

Huh no prompt for a password there just login: over and over.
Boot into single user mode.

FreeBSD/PowerPC U-Boot bootstrap loader, Revision 2.4
(dc-builder@svl-cdbu-pool007.juniper.net, Wed Jun 19 20:28:02 PDT 2013)
Memory: 2048MB
bootsequencing is enabled
bootsuccess is set
new boot device = disk0
Loading /boot/defaults/loader.conf
/kernel data=0xb5cbe6+0xd582a syms=[0x4+0x9d690+0x4+0xe62e2]

Hit [Enter] to boot immediately, or space bar for command prompt.

Type ‘?’ for a list of commands, ‘help’ for more detailed help.
loader> boot -s

Trying to mount root from ufs:/dev/da0s1a
Attaching /packages/junos via /dev/mdctl…
Mounted junos-ex package on /dev/md0…
System watchdog timer disabled
Enter full pathname of shell or ‘recovery’ for root password recovery or RETURN for /bin/sh:

Just hit enter and don’t go into recovery. Prompt changes to #.

NOTE: to go to multi-user operation, exit the single-user shell (with ^D)
# mount -a
WARNING: /config was not properly dismounted
WARNING: /var was not properly dismounted
/var: mount pending error: blocks 4 files 1

# chflags 0 /var/etc/pam.conf
# exit

chflags 0 /var/etc/pam.conf and exit to reboot. This fixed the problem where I just kept seeing login: over and over with no password prompt.

Amnesiac (ttyu0)

login: root
— JUNOS 14.1X53-D12.9 built 2015-06-25 03:06:46 UTC
rts_filter_prep_fields error getting rt_flags in rtentry_t
root@:RE:0% al daemons:set cores for group access
root@:RE:0%

Logs in correctly now and I ran the JunOS upgrade from here and got everything stable again.

Annoying messages.
Auto Image Upgrade: To stop, on CLI apply
“delete chassis auto-image-upgrade” and commit

Auto Image Upgrade: No DHCP Client in bound state, reset all DHCP clients
Auto Upgrade: DHCP Client State Reset: irb.0 vme.0
configure
Entering configuration mode

{master:0}[edit]
root# delete chassis auto-image-upgrade

{master:0}[edit]
root#
set system root-authentication plain-text-password
New password:
Retype new password:

{master:0}[edit]
root# commit
configuration check succeeds
commit complete

{master:0}[edit]
root> request system software add /var/tmp/jinstall-ex-4300-17.3R3.10-signed.tgz reboot
NOTICE: Validating configuration against jinstall-ex-4300-17.3R3.10-signed.tgz.
NOTICE: Use the ‘no-validate’ option to skip this if desired.
Verify the signature of the new package
Verified jinstall-ex-4300-17.3R3.10.tgz signed by PackageProductionRSA_2018
WARNING: A reboot is required to install the software
WARNING: Use the ‘request system reboot’ command immediately
Rebooting …
shutdown: [pid 2254]
Shutdown NOW!

Boots up in the new OS
root@:RE:0%
root@:RE:0% cli
{master:0}
root>
{master:0}
root> show version
fpc0:
————————————————————————–
Model: ex4300-48p
Junos: 17.3R3.10
JUNOS EX Software Suite [17.3R3.10]
JUNOS FIPS mode utilities [17.3R3.10]
JUNOS Crypto Software Suite [17.3R3.10]
JUNOS Online Documentation [17.3R3.10]
JUNOS jsd [powerpc-17.3R3.10-jet-1]
JUNOS SDN Software Suite [17.3R3.10]
JUNOS EX 4300 Software Suite [17.3R3.10]
JUNOS Web Management Platform Package [17.3R3.10]
JUNOS py-base-powerpc [17.3R3.10]
JUNOS py-extensions-powerpc [17.3R3.10]

Get rid of some errors related to snapshots being different.
root> request system snapshot media internal slice alternate all-members
fpc0:
————————————————————————–
Formatting alternate root (/dev/da0s1a)…

Copying ‘/dev/da0s2a’ to ‘/dev/da0s1a’ .. (this may take a few minutes)
The following filesystems were archived: /

{master:0}
root>
root> show system alarms
4 alarms currently active
Alarm time Class Description
2019-02-15 12:20:53 UTC Major FPC 0 PSU 1 Output Failure
2019-02-15 12:20:48 UTC Major FPC 0 PSU 1 Not OK
2019-02-15 12:20:38 UTC Major Management Ethernet Link Down
2019-02-15 12:20:01 UTC Minor Rescue configuration is not set

{master:0}
root> show chassis alarms
3 alarms currently active
Alarm time Class Description
2019-02-15 12:20:53 UTC Major FPC 0 PSU 1 Output Failure
2019-02-15 12:20:48 UTC Major FPC 0 PSU 1 Not OK
2019-02-15 12:20:38 UTC Major Management Ethernet Link Down

Clean up some more alarms.
root> request system configuration rescue save

Power it down and wait till I need this as it is now the spare.